
Allplan is only available for Windows, hence Allplan is only running on this operating system. But you can still install Allplan on your Mac.
However, this requires some additional steps. With the Boot Camp program, Apple offers a simple solution. Boot Camp installs Windows to a separate partition of your Mac where you can then install and use Allplan. The following six steps show you how to achieve this.
It is also possible to use Windows on your Mac via a virtual environment (e.g. using Parallels). Although this option consumes a little more performance, it will only have a minor impact on your work.
New information about the M1 chip: Due to the new processor structure, it is not possible to install Windows via Bootcamp on a Mac with an M1 chip. Allplan can be installed from version 2022-1-4 using Parallels 17 Pro.
However, since Parallels reduces the performance of your Mac, this unfortunately also affects Allplan. But this is not dramatic. The performance of your Mac is sufficient to run Allplan stabily and smoothly on your Mac. Even medium-sized projects can be edited with Allplan via Parallels with a good user experience.
As soon as there are new developments, we will announce them here.
1. Requirements
Check the following four points, to make sure that the installation of Windows and the usage of Allplan won't cause any problems.

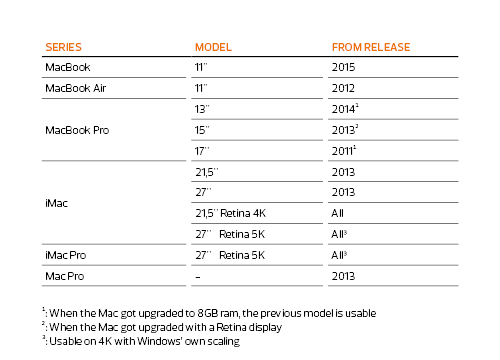
1.1 Current Mac – The following table lists all Macs with whom you can use Allplan with. Please check whether your Mac is included.
Note: To find the release date of your Mac, click the Apple icon in the top left and then click “About This Mac”. Enclosed in brackets, the release year is right behind the model.

1.2 Latest macOS version – Check whether your Mac operating system is up-to-date. Click the Apple icon in the top left, click “About this Mac” and then “Software Update”. Once the App Store opens, click on the section “Updates” to update the operating system on your Mac.

1.3 Official Windows license – To activate Windows during installation, you require an official Windows license. As a student, you usually get a free license from your university.
Note: You can use Windows 7, 8.1 or 10.

1.4 Official Windows file – To install Windows, you require a Windows installation file, which is called ISO. Windows provides this file as a free download.
Please make sure you download the 64-bit version.
2. Installation
After you have prepared everything, you can install Windows and Allplan on your Mac in no time.

2.1 Installing with Boot Camp – Install Windows using Boot Camp. Apple shows you how to do this step by step on their Boot Camp support website.
Note: Do not worry about the system requirements. We already checked this at the beginning (see point 1.1).

2.2 Installing Allplan – After Boot Camp has installed Windows, you can start Windows on your Mac.
Note: Windows starts automatically during installation.
Note: To switch between Mac and Windows, you must keep the "Option" key pressed during startup of your Mac. In addition, you can tell your Mac which operating system to start up. To do this, open the System Preferences on MacOs and choose "Startup Disk".
Installation:
Apple bietet hier eine Umfangreiche Hilfe-Seite, welche dir bei der Installation an die Hand nimmt.
TIPP: Über die Mindestvoraussetzungen musst du dir jedoch keine Sorgen machen, wir haben für dich vorgefiltert. Wenn dein Mac in der Übersichtstabelle enthalten ist, wirst du keine Probleme haben.
Wenn Bootcamp Windows erfolgreich installiert hat, kannst du deinen Mac-Computer neustarten, um Windows zu starten. Halte die „Option“-Taste gedrückt, bis sich eine Auswahl öffnet. Wähle „BOOTCAMP“ und bestätige die Auswahl mit Enter. Nachdem Windows hochgefahren ist, kann du Allplan wie gewohnt herunterladen.
Additional option: Paralells
Parallels emulates Windows without Boot Camp directly on MacOS. This option makes it easier for you to use Windows; however, it uses more resources.